[Affiliate Disclosure: We receive a commission if you purchase something through one of the links below! Affiliate commission is one of the ways we keep the lights on here at PA — it also helps us provide tons of useful free content and 100% free proofreader referral services.]
Whether you’re a seasoned freelancer or a beginner, having a website will make securing your next client a whole lot easier.
A website allows you to show off your skills and experience while building a strong brand identity that people can trust.
Creating a website can be difficult, especially if you’re not tech-savvy. It may even seem impossible.
How can you understand the back of a website if you can’t even understand the front of it?
But don’t worry. Despite how complicated it might seem, building a website is easy, even for someone without any tech skills.
Businesses with websites see an increase in sales of 15% to 50% more than similar businesses without an online presence.
Below, we’ll cover all the reasons why building a website can help kickstart, or upgrade, your business.
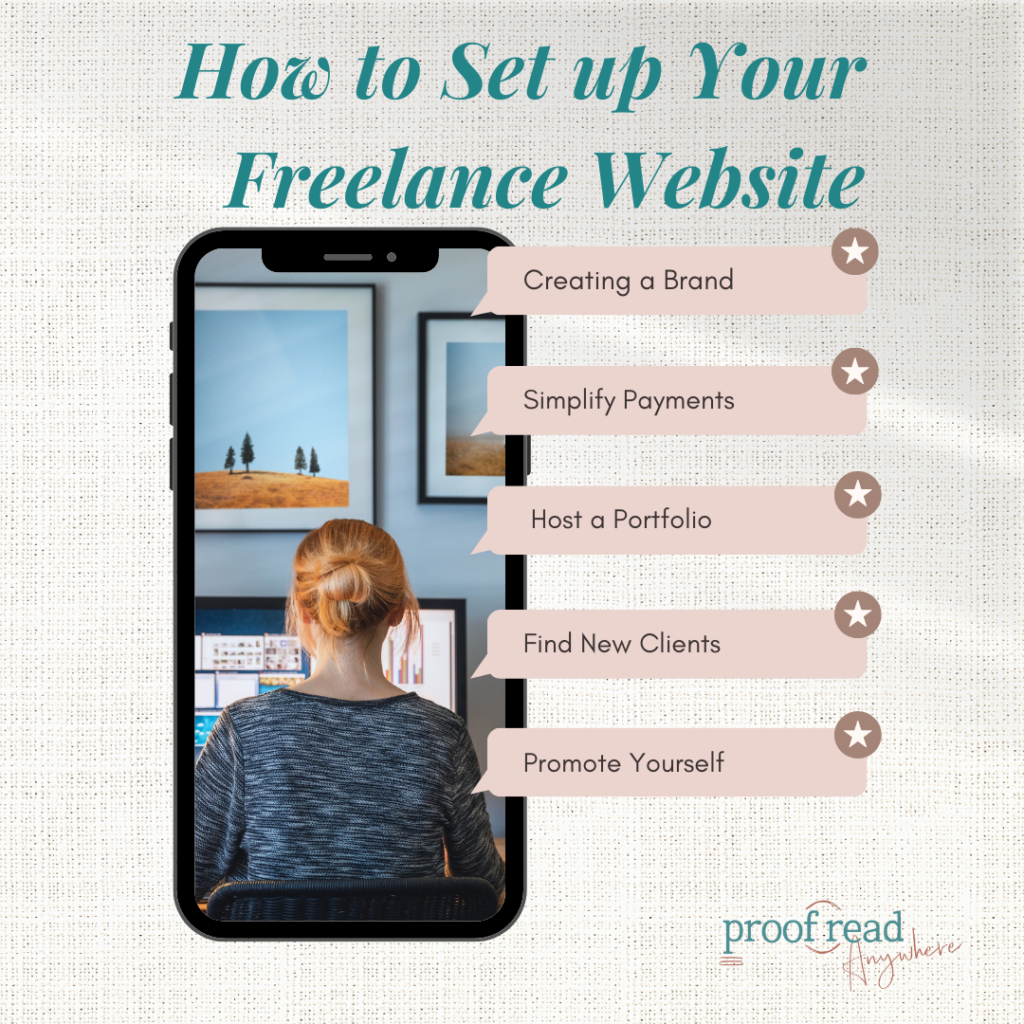
We’ll guide you through the website-building process: how to set up the site, customize the pages, what content to add, and ways to establish a brand identity.
Reasons to Set up a Website for Your Freelance Business
Building a website may seem daunting and not worth the time and energy. However, the process is a lot simpler than you would think!
Once the website is up and running, you’ll have a place to connect with potential clients, introduce your brand, and show off your work. These factors can help your freelance business take off.
Websites Help You Make Money Online
An online presence increases your customer reach significantly.
If you’re selling products, having physical customers or word-of-mouth referrals can limit your growth. Instead, with an online shop, you can connect with the 2 billion digital buyers across the world who shop online each year.
Having a website as part of your online presence is particularly important as a freelance worker. While some clients use Upwork or job boards to hire freelancers, many clients simply do a quick Google search, using phrases like “freelancers in my area.”
With a website and proper Search Engine Optimization (SEO) practices, (more on this later) your services can appear on the first page of search results and get seen by more people — you’ll reach an even wider audience with a website, which translates to more clients and more profits for you in the long run.
With a website, you can also make it clear exactly what you offer, showcase samples of your work, and detail your experience: all things that can convince potential clients to put their trust in you. This leads us to our next point that’ll help you nail your picture-perfect brand for your business.
A Website Can Introduce or Solidify your Brand
Having a clean, professional website is one of the best ways to introduce or solidify your brand. It’s an easy way to portray your brand image, show off samples of your work, and share previous client testimonials, which will help back up your reputation and credibility.
Did you know that 59% percent of people are likely to do repeat business with companies that have well-designed and easy-to-use websites? Consumer data has even shown that customers trust brand websites, that are well-built, more than a brand that just operates over social media.
Site Features for Customer Relations
Extra features on your website can help customers interact with you and your brand, helping you reach more customers and drive up sales:
- A Blog page: Add a page with posts related to your industry to engage viewers
- Newsletter sign-ups: Include a button for users to easily sign up for your monthly newsletter to share the latest news about your business and occasional offers
- Membership sign-ups: Start an exclusive online membership club by establishing a loyalty program and adding a sign-up option on your website
- Comments and live chat: Add a comment or live chat features to interact with clients, giving you a chance to help improve customer satisfaction while building a positive relationship
Even if you only have one, or a few, of these pages, putting effort into user experience always pays off for websites.
Search Engine Optimization
Another huge benefit of a website is the opportunity to optimize your site for search engines. SEO refers to the process of improving your website and its content to increase its visibility on search engines like Google and Bing. A website with strong SEO attracts people through organic search, giving you a passive, easy way to secure clients.
SEO can be tricky to wrap your head around, but it’s worth learning the basics as a business owner. Moz has a great, beginner’s guide to SEO.
Simplify Your Payments and Contracts
Accepting payments and managing your contracts with clients online, through your personal website, makes it simpler for clients to purchase your services.
Online Payments
Online payment systems also let you manage your contracts and payments without needing a printer or hassling with bank transfers, saving you time to work on other business tasks.
For example, you can use the payment processing software Stripe, which allows you to automatically receive online payments in several different forms, including credit cards, vouchers, and digital wallets. The payments are quick, and the funds are sent directly to your account.
Most systems also offer flexible payment options like “buy now, pay later” and paying in monthly installments.
Accepting payments through an online store also gives you full control over your sales data. You’ll easily be able to track purchase trends of your goods, which can give you the confidence to make changes to your services, add new products, or raise your prices.
Contract Management
There are even plugins that can let you add a contract agreement to your website that clients can digitally fill in and sign with their mouse, like WPForms.
Thanks to plugins like this, you won’t need to go back and forth with clients over email to arrange contracts, nor will you need to print anything or physically scan your signature.
All of these factors can help you close deals quicker and more efficiently. You won’t have to struggle with creating the actual contract design either — many plugins offer premade contract templates, which can be customized easily to your liking.
6 Steps to Create a Freelance Website
Now that you are convinced that having a freelance website can help you make extra cash, we’ve laid out the exact steps you can take to set up your own incredible website.
Step 1: Setting Up Your Brand and Identity

Brand identity is the image clients have of your business. Specifically, brand identity is made up of portrayed values, personality, and goals. The earlier you identify and define your brand, the better because a solid brand will give clients something more tangible to connect with, help the website design process go smoothly, and help you stay true to your core values throughout your business venture.
Of course, identifying and defining what exactly your brand’s personality, values, and goals are is easier said than done!
This is especially the case if you’re starting your first online business. You won’t have to navigate this alone though — plenty of online courses and resources can help you pinpoint your brand identity.
Our personal favorite is Tory Brandings’ free brand identity worksheet. It explains how to develop a strong brand for your business in a beginner-friendly way, with plenty of activities to get you thinking.
Name Your Business
First impressions count! Your business name should be clear and simple, and reflect what your business stands for.
While it can be tempting to opt for a “sophisticated,” lengthy name to create an impression, choose something your clients will likely remember (attention spans are shrinking) and that quickly conveys what your business is about.
A great strategy for choosing a great business name is to use your actual name with a descriptor relating to your business, such as “Editing by Allison,” “Poppy the Proofreader,” or “Ana’s Copyediting.” We’re sure you’ll agree that these names are memorable and personable, and convey what the business stands for.
This naming approach is also fantastic for SEO because, if a prospective client searches for your name (or the services you offer) in Google, they’ll find your website quickly. However, business names only help if you don’t use an ambiguous name for your company like “WordFixer.”
Pro tip: Apply the same naming guidelines when naming your services or products!
Brainstorm Your Brand Image
Your brand image is more than a fancy logo, although logos certainly help. A brand image is each visual element that shapes your clients’ perception of your business, right down to your color theme and font style.
The “appropriate” design to choose for your business depends on your brand’s identity, the services or products you sell, and your target clientele.
Apple is one of the best examples of a strong brand image. Take a trip to their website, and you’ll instantly be immersed in a modern and innovative realm that’s accessible to the everyday consumer.
The color palette gives off a cutting-edge feel, the images are bold and futuristic, and the language used amplifies their “power to the people” value.
Without this successful brand image, Apple would not be where they are today — the first-ever company to record a market capitalization of $1 trillion. Luckily, there are plenty of resources out there that can help you brainstorm for and develop a strong brand image for your own freelance business.
Here is some software to make your branding for free:
- DaFont: A resource site for downloading unique, stylistic fonts
- Coolors: A color palette generator that can help you identify and create your brand colors
- Pexels: A resource site where you can find free images for commercial use
- Canva: An editing app for easily designing logos, social media posts, and website graphics
If you’re short on time and don’t want to create a brand image from scratch, you can also hire a graphic designer or use a premade theme. You can find plenty of premade themes online at an affordable price, though many website builders also provide free options.
Step 2: Secure Your Domain Name
Right. Don’t panic just yet. “Domain name” may sound technical, but it’s essentially a fancy term for your website address: what users type into their browser bar to access your site.
You do have to pay to secure (and maintain) the domain name of your choice, though prices vary significantly from around $10 to $20 per year, and “.com” sites cost more than sites ending in “.co” or “.net”. It’s best to stick to a “.com” domain since it’s easier for clients to remember.
Choosing a domain name that matches your company name is vital. It’s more memorable, conveys your branding from the get-go, and performs better in search engines, which in turn makes it easier for clients to find your site.
There are several sites available where you can buy domain names, including Blue Host, GoDaddy, and Namecheap, though an easier option is to buy the domain through your site builder tool.
- WordPress: Go to Upgrades and choose the Domains option in the sidebar, and click on Add domain. Next, select Search for a domain and type in your preferred domain name. Select your domain name from the search results and then enter your payment information to secure it (Here’s a step-by-step guide with screenshots to guide you)
- Wix: Go to your site’s domain page, click Buy a domain, enter your desired domain name in the search box, and then select Get it. Choose your registration period and then enter your contact information and payment details (Here’s a full guide to help you)
- Weebly: Go to your Weebly account dashboard, scroll down, and select Set up your domain. Enter your desired domain name in the search bar and check if it’s available. If it is, enter your payment details and any other necessary information (Here’s a quick video guide of the process)
Step 3: Setting up Your Website
Back in the day, setting up a website was a time-consuming process where you had to be apt at coding, web design, and debugging.
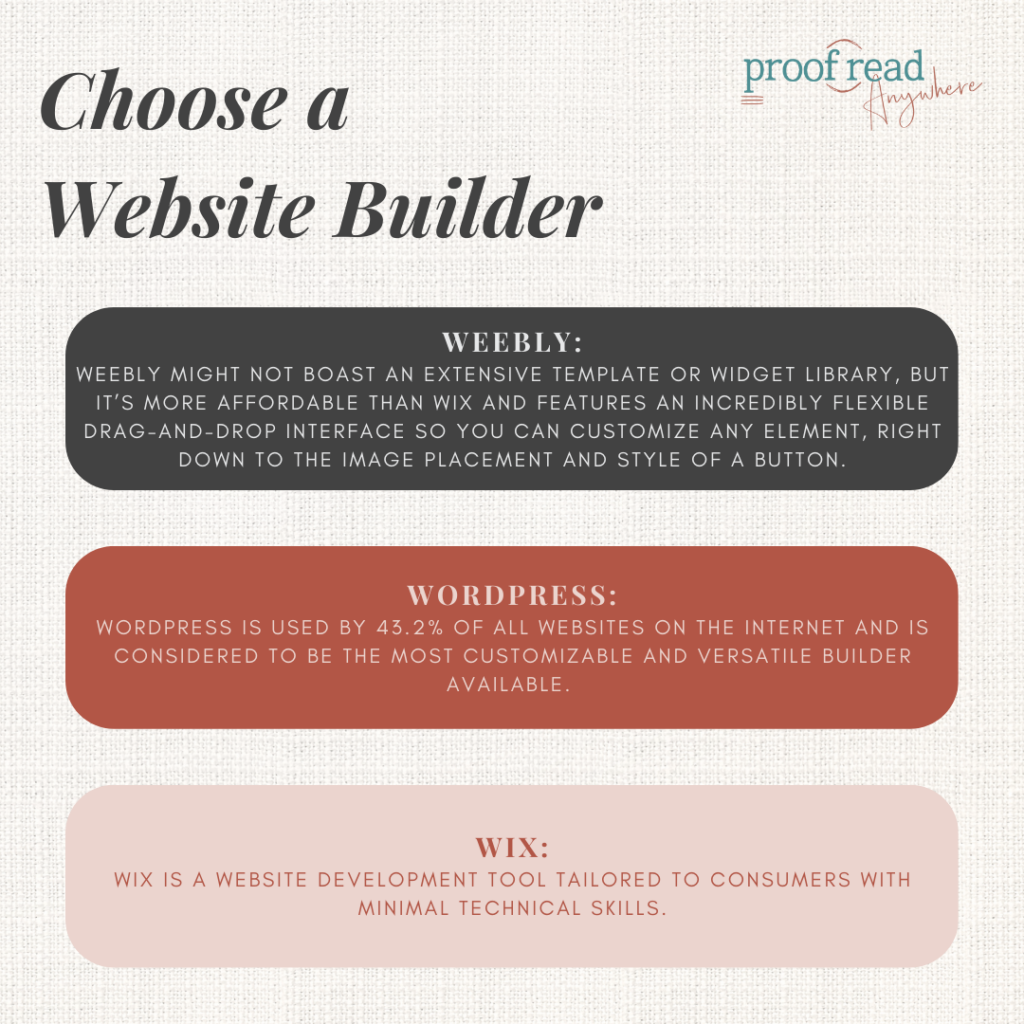
Today, there are several website builders available that can help you create a professional-looking website in a few simple steps — and you don’t even need coding experience. Some of the most popular website hosts include WordPress, Wix, and Weebly.
Weebly
Weebly might not boast an extensive template or widget library, but it’s more affordable than Wix and features an incredibly flexible drag-and-drop interface so you can customize any element, right down to the image placement and style of a button. Weebly also offers an in-depth help section with plenty of guides and advice to assist users throughout the web-building process. Plus, your entire site is automatically mobile responsive.
Weebly does have a limited content management system, which can be frustrating if you want to set up a blog for your business later. However, Weebly is still ideal for freelancers on a budget or those who want a flexible interface.
WordPress
WordPress is used by 45.8% of all websites on the internet, according to 2023 stats, and is considered to be the most customizable and versatile builder available. While WordPress requires a more hands-on approach than other web builders, it’s affordable, has plenty of pre-made layouts for new website owners, and features a reliable content management system.
We recommend WordPress for freelancers with some technical experience up their sleeves, or for those that want complete control over their website design and are willing to put in the time and dedication to figuring out the platform interface.
Wix
Wix is a website development tool tailored to consumers with minimal technical skills. Wix offers over 800 easy pre-made website design options — making it one of (if not) the biggest template libraries — and a visual drag-and-drop interface that makes designing easy for beginners. Wix also offers a variety of widgets for customizing your site and integrating services.
Setting up sites using Wix is easy for beginners and fast to do, but Wix websites are known to experience long loading times. Wix also doesn’t allow changing a site theme once the site is published, which can be a total nightmare if you want to adjust your brand image later without completely starting over.
However, if you want to quickly launch a professional-looking website that’s also easy to maintain, we believe the pros outweigh the cons.
Choosing Which Site Builder Is Right for You
The best site builders for creating your business website include many design features like website templates and widgets that are easy for beginners to use. Some features worth considering as a beginner designer include the content management system, price, page response time, and interface.
WordPress allows more control over design and offers more custom features than other web design platforms, but it’s not for everyone. The platform’s advanced features make it good for people with a basic understanding of coding to use WordPress to its full potential.
If you’re a beginner web designer or creating a website for the first time, opt for Wix or Weebly. Wix site builder offers beginners the convenience of premade website themes, and Weebly website builder offers great customer support.
Step 4: Customize Your Website
Time to get creative! Customizing your website through a builder is an incredibly fun process—you can play around with colors, explore and test out a range of prebuilt themes, add images, choose fonts, and customize the buttons and menu bars to your liking. Many website builders even allow you to incorporate transition effects, like text that fades in at page loading.
When customizing your site, ensure your choices reflect your brand and give customers a pleasant experience when they visit your site.
Focus on these top features for a fast load speed and good customer experience:
- Ease of navigation: The menu bar should be easily accessible. Page names should be visible, clear, and well-organized
- Images: Images should relate to your freelance services and convey your brand identity. Also, ensure you aren’t breaking any copyright laws if you source images from the web.
In most cases, you’ll need to pay the creator a fee to use their images for commercial use, though there are image libraries, like Unsplash and Pexels, where all the pictures uploaded are free for commercial use
- Mobile friendliness: Your site layout must be compatible with mobile devices. After all, over 50% of web traffic comes from mobile devices, and at least 79% of smartphone users have made an online purchase using their mobiles in the last 6 months.
Some web builders like Weebly automatically adjust your site’s design for mobile devices, though you may have to make some design changes yourself
Add-Ons
You can download and install add-ons, called widgets or plugins, that further your customization options without the need to code.
Elementor is a WordPress plugin that transforms the standard interface into a drag-and-drop interface, allowing you to easily place and edit every element on the site. It even provides premade elements, such as image carousels, review designs, and animated headlines.
Wix Social Media Stream app is a widget offered by Wix that allows you to easily link all your socials to your website and drive more traffic to your social media.
Colors and Fonts
While designing, ensure the font is easy to read. Sure, a calligraphy-style font might look visually pleasing, but your clients shouldn’t have to put their brains to work to decipher the text itself. Instead, opt for an easy-to-read font that has simple, distinct lettering.
Also remember to match your website design to your brand values, personality, and goals to help your clients and prospects find and relate to you. In other words, don’t opt for a neon yellow background if you’re offering a professional, formal service like transcript proofreading.
Speaking of transcript proofreading, if that is a service you’re interested in providing or want to learn more about, you can get a free 7-day intro to our transcript proofreading course.
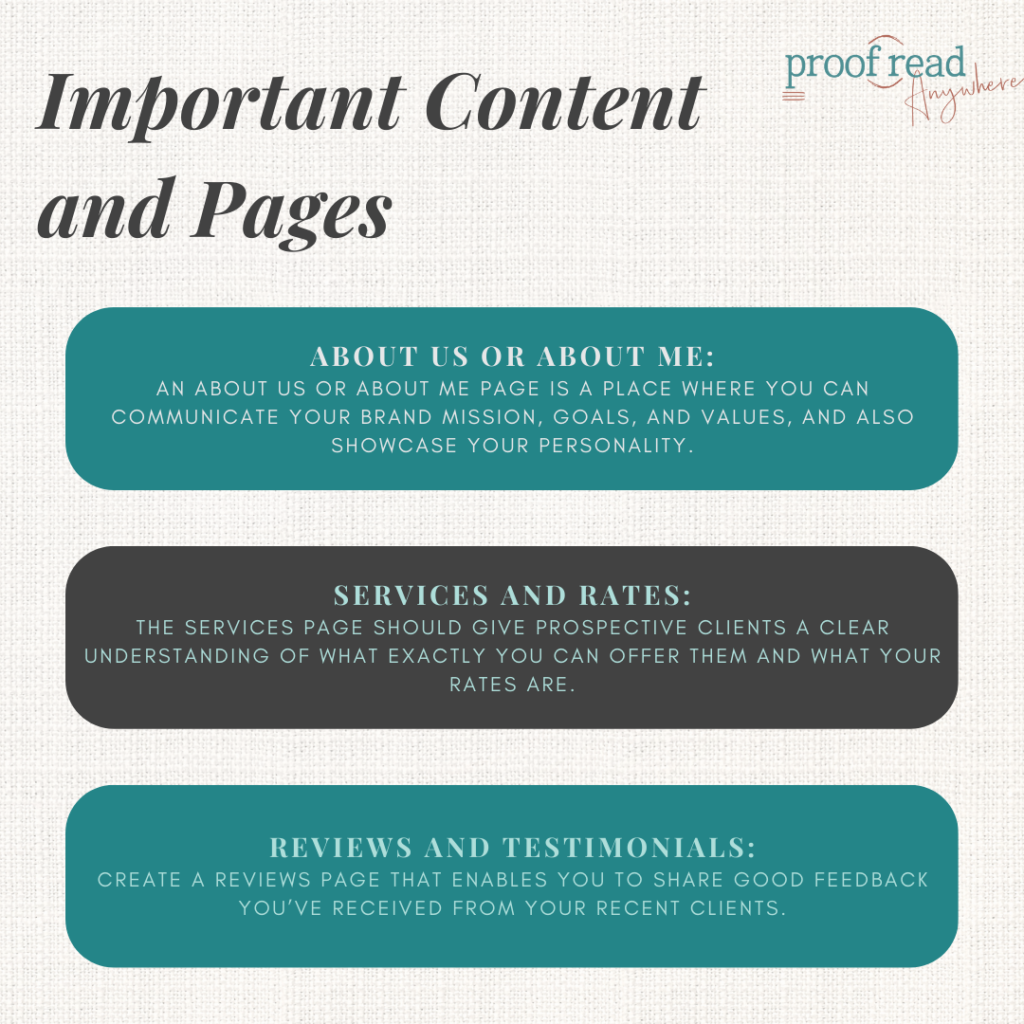
Step 5: Add Important Content and Pages
Your homepage should be the ultimate showstopper to lure in potential clients. However, if you want your prospects to stay longer on your site and learn more about your business, you’ll need to add a few other pages, including an About Us page, and Services, Rates, and Contact Us pages.
About Us or About Me
An About Us or About Me page is a place where you can communicate your brand mission, goals, and values, and also showcase your personality. Generally, an About page should include a biography about how the business began, and include examples of your work to show clients what you can do for them.
An online freelance portfolio of your work helps to build trust with clients and prospects by giving them an in-depth insight into how you work and the quality of your services. You can add examples to the About page or a separate Portfolio page. Include your best pieces of work and explain in detail how you approached each project.
A photo isn’t necessary, but it does put a face behind the business which can help clients trust you. You can include a photo that portrays you in a professional but friendly and relatable light.
You should also include links to your company’s social media accounts and mention any awards your business has received.
Services
The Services page should give prospective clients a clear understanding of what exactly you can offer them. Each service should have a detailed description that’s digestible, concise, and speaks to your customer’s pain points. For example, if you’re offering proofreading services, emphasize how your service will ensure clients never have to face the embarrassment of using “Your” instead of “You’re” again!
You should also use images to break up bulk text and to help customers remember your services. It’s shown that people remember things better involving visual content.
Rates
Let’s be real. There’s nothing more frustrating than talking to a client for hours on end about their project, only to find out later on that they can’t afford your rates. It’s inconvenient, wastes a lot of time, and could have easily been avoided from the get-go if you had a dedicated Rates page!
Include a visually-appealing table of your services and their corresponding rates, and mention if these are flat rates or can vary depending on factors like complexity, deadline, or expectations. You can also provide your contact information for clients to obtain detailed pricing.
Reviews and Client/Customer Testimonials
Did your previous clients sing your praises? Then don’t keep it to yourself! Create a Reviews page that enables you to share good feedback you’ve received from your recent clients.
Most website builders have review page templates that you can customize and adjust to suit your overall theme. You can either add the reviews to the page yourself (don’t forget to have them sign an information release form first) or enable comments and allow customers to post their feedback directly. You can also install a widget with a review management system.
Customer reviews are one of the most effective ways to build trust and are often what people rely on when deciding whether or not to make a purchase. A recent survey found that 98% of shoppers read online reviews to help them decide on purchasing a local business.
And you might think asking clients to provide reviews can be daunting, but it doesn’t have to be. After you’ve given customers enough time to try out your products or experience your service, send a quick email that’s polite, and professional, and expresses gratitude.
If a client or customer agrees to give you a review, make sure to get a signed information release form, which lets you safely use the person’s testimonial on any of your platforms (e.g. website, social media, adverts). Plus, it’ll give the client a full understanding of how their review will be used.
Contact Us
The Contact Us page should be super easy to find, with an email contact form and links to your active social media profiles. Most website builders have a feature to create a contact form for your site, but there are also plenty of plugins available, such as WPForms and Ninja Forms.
Avoid displaying your actual email address on the Contact page because it’ll likely attract spam. A dedicated contact form is a convenient place for clients to get in touch with you quickly without the hassle of opening their actual email.
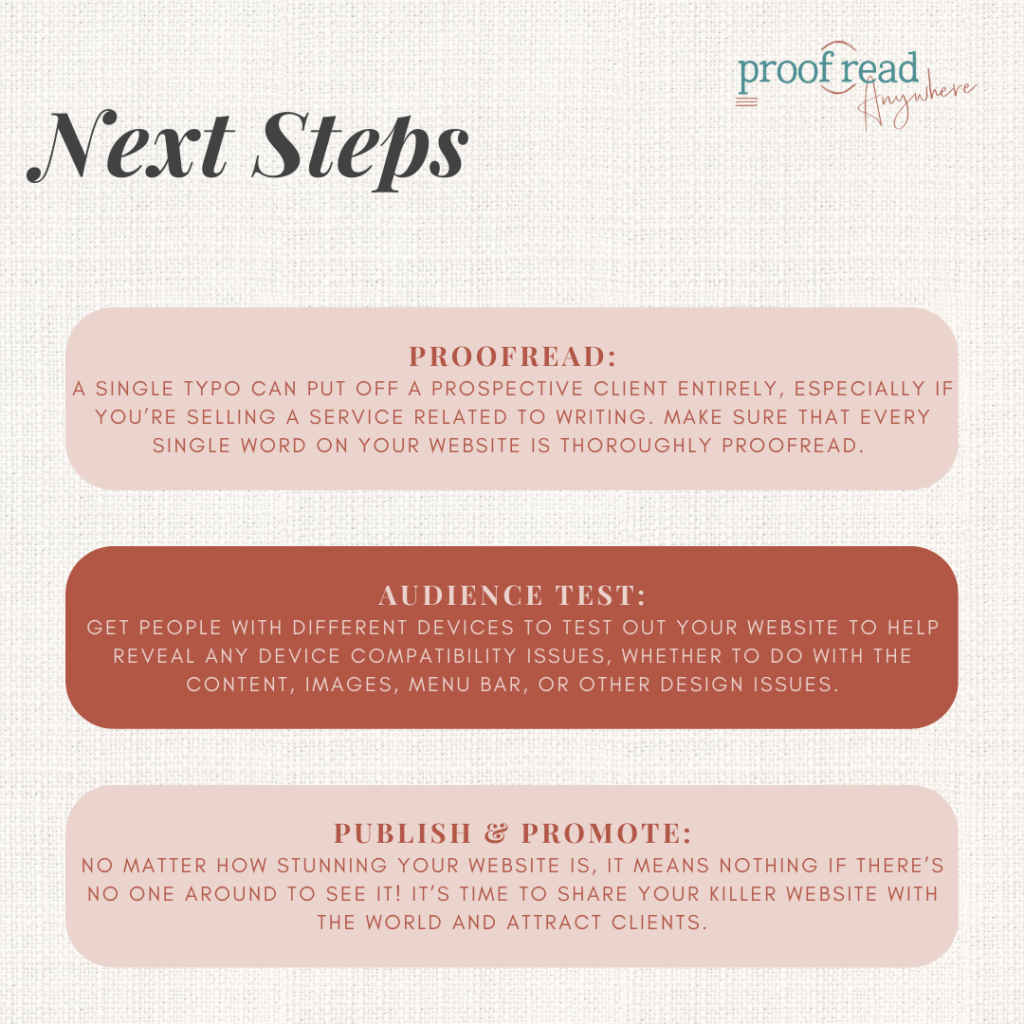
Step 6: Proofread, Publish, and Promote
Congrats! You’ve made it to step six, which means you’ve now crafted a stunning, engaging website that’ll promote your business, attract clients, and help you stick to your core values. But before you make your site live, there are a few final touches to do.
First up? Proofread everything and let someone else take a look.
Proofreading and Audience Testing
A single typo can put off a prospective client entirely, especially if you’re selling a service related to writing. Make sure that every single word on your website is thoroughly proofread. You can do this yourself if you have an articulate eye or you can hire an external proofreader if you struggle to identify issues with your writing.
Check out our General Proofreading workshop to learn more about becoming a freelance proofreader or download our Beginner’s Guide to Proofreading for Profit!
Once you’ve proofread your content, show your website to friends or family to get a fresh perspective. They may be able to spot small mistakes or problems that you missed while creating the site.
Get people with different devices to test out your website to help reveal any device compatibility issues, whether to do with the content, images, menu bar, or other design issues. If friends or relatives are willing, you can also get them to read through the content to make sure everything is readable and understandable.
As a final step, double-check that you haven’t fallen foul of these common website design mistakes:
- Grammar, spelling, or punctuation errors
- Sudden font changes
- Incorrect (or outdated) contact information
- Inaccurate rates
- Mislinked buttons
- Excessive website elements (overcrowding is distracting and slows down loading time)
Once your website is live, remember to update its installed theme and plugins regularly. Even just one out-of-date element can make you vulnerable to hacks or cause your website to run slowly.
Also update the site’s content frequently, whether by adding more customer reviews, blog posts, or samples to your portfolio. Fresh content can help with your Google ranking (especially if it’s crafted with SEO practices in mind) and build trust with your audience.
Publish Your Website and Promote Your Brand
No matter how stunning your website is, it means nothing if there’s no one around to see it! It’s time to share your killer website with the world and attract clients. Website promotion doesn’t have to leave a hole in your wallet either.
There are plenty of affordable (and even free) ways to spread the word about your new website and services:
- Share your website and services in freelance community groups across social media
- Craft a press release
- Set up your blog on the website and post regularly
- Guest blog in your respective business field
- Create social media profiles for your business
- Craft search-optimized content, with keyword research
- Secure backlink opportunities
- Create YouTube videos related to your business
- Add your site and business to online directories
- Run an email marketing campaign
- Pay for ads on social media or Google
For more marketing tips, check out the Freelancers Bible. It covers everything you need to know about growing your small business, including easy-to-follow strategies to market yourself online.
Indexing with Google Search
Your website should appear (be “indexed”) on Google automatically, though you can have full customization of how it appears and how quickly it is indexed by registering your website domain with Google Search Console.
It may seem complicated at first, but indexing is relatively easy:
- Open the Google Search Console page and select Start now
- In the Domain section, enter your website URL
- Follow Google’s instructions to verify that you own the site. Reach out to your hosting provider or check online video guides for step-by-step assistance
Once you’ve verified the site, you can submit a sitemap, which is a file that lists the URLs of your website pages, to help Google find and properly index all the important site pages.
The easiest way to do this is to install a plugin that automatically creates a sitemap for you, such as Yoast SEO.
Final Thoughts
You don’t need to be a tech wiz to get a business website up and running. Anyone can set up a website with the right tools, a positive mindset, and a beginner-friendly website builder. Once live, a website will truly help your small business grow and connect you with new clients.
Remember to update your website’s content regularly, spread the word across social media, and build up some visibility with the likes of email campaigns and blog posts.
If you want to find out what other freelance jobs you can do to supplement your income until your business takes off, make sure to check out our work-at-home job ideas or where can I find proofreading jobs online? articles.
And if you need any more help with running your small business, read our work-at-home survival guide. It includes plenty of tips for setting up a successful freelance business.
This post is fantastic! I’ve read a lot about creating a blog/website, but this is the first post I’ve ever seen that clearly addressed every question/topic I was curious about. Looking forward to putting this all into practice soon! Thanks again!
I’m so glad you found it helpful!! Feel free to share with anyone who is stuck on how to start up. I know it would’ve been super helpful for me starting out!!
Wow, Caitlyn! Thank you so much for all of this great information and for the time and effort you put into helping others’ success, not just in proofreading, but any small business startup!
Glad you found it helpful!! You’ll always receive only the best from me 🙂
I have not finished the course work yet, but I am trying to do a little planning ahead for when my marketing time comes. Is there anyone who would be willing to leave a link to their website? I have no idea where to start when it comes to building content. Any extra help would be greatly appreciated!
Caitlin,
Excellent!! If this is any indication of your thoroughness as an instructor, I can’t wait to start your course.
Thank you!
Julie N.
I’m crazy thorough. No stone is left unturned 😀
Wow you really took the time to lay out the details. One of the best tutorial’s I’ve seen on this. Thank you so much!
Cringing at the fact I put an apostrophe ‘s’ on tutorials above. LOL.
Caitlin, Thank you for writing this awesome post. This was great and much needed information. I can’t wait to put it to use. Keep up the great work.
Thank you for this fantastic information. I’m talking the course and trying to come up with a name. I already own the domain with my name and I may use that, so I can add services at a later time. I will probably switch to Bluehost too. My current provider took away my free email and the monthly charge is not worth it. I haven’t mastered WordPress, but this makes it seem less daunting. Thank you again!
Awesome!! You are very welcome.
This is great, Caitlin! Thank you.
Thank you, Caitlan. This post is full of helpful information that gives me confidence to start my own website . . . sooner than later!
Oops! I’m typing on my iPad, and hit an m instead of an n in my email address. I caught the mistake, but the message was already zooming into cyberspace. Lesson learned: slow down and proofread!!! ? Ramona
But you did not tell how will my clients find me , my website I mean ?
Hey, Shaurya! The SEO plugin will help you with that. SEO stands for “search engine optimizer” and helps you target the right audiences, including potential clients. And, of course, your website is just one tool in your marketing toolbox! Good luck!
Hello Caitlin Pyle
I must admit that these helpful tips can not be found in free places. Just few paid courses may teach you this kind of info.
Thanks so much for sharing this guide
Omar
Thank you SO much. This is the first complete and understandable post I’ve EVER read on setting up your website!
Great information here Caitlin. Very easy to follow. Thank you!
I find this lesson on website development inspiring. It is a step to in right direction. At what stage of biz set up is it needed?
Wadanya
You should definitely wait until after your training is complete in whatever you’re doing before you set up your website. After that, it’s up to you. Most people like to have a website set up right away to refer people to when they start marketing. Others will wait a while, and some won’t create a website at all.
Excellent point Amy. My main focus is deciding whether I will move forward with the program. I’m not the best proofreader but I am persistence. Today I listened to a Grammar Girl podcast and found it extremely helpful. I’ll deal with marketing and websites after training.
Hi Caitlin,
Thanks for the very helpful article! I just wanted to let you know that I’m going through the process of setting up a new website using the Bluehost + Install WordPress process… but found that the “Install WordPress” option is NOT free 🙁
It’s $99 for their cheapest option. Which is a bummer, as I wasn’t expecting to have to pay more than the Bluehost fee… just wondering if I’m missing something, or if the article perhaps needs to be updated? Just wanted to check!
Thanks and best,
Johanna
Don’t forget step 8! : ) The option to install WordPress is still free. You definitely will have options to pay more and upgrade, but if you follow the steps and click on Install from Mojo Marketplace, the option shown above will have WordPress for free!
Thank you so much for your very detailed and informative article. I have attempted Google searches and have asked my LinkedIn connections, but the information has been vague at best.
I am on Upwork and Freelancer, but I want to build my business and my availability to potential clients. Your information will prove to be very helpful.
Is the Under Construction plugin free?
Be sure to make your domain private when setting it up or you will receive a lot of spam mail and a ton of unwanted phone calls.
I am so thankful to have discovered your awesome course and tutorials that I am almost in tears. I am an army veteran with disabilities that preclude my working in the fields for which I have been trained. I have 20 years of military service and two masters degrees, one of which I completed two years ago in special education. The other one is in legal studies. I owe $180,000 in student loans. I have been searching and searching for a career that I can do at home – a home business – and had been considering Court Reporting, but I didn’t want to invest that amount of time – or money. Since I love reading, writing, and research, I was looking for something relative to those areas, and your course seems to fit the bill. Your website is extremely professional, aesthetically pleasing, and user-friendly; your instruction is clear and thorough, and your fees are beyond reasonable. Plus you even offer a payment plan!! I cannot thank you enough. May God bless you in your life, work, and all of your future endeavors.
Hi swaller58,
I too, like you, am extremely grateful for Caitlin's work. She seems to go the extra mile for people who are where she once was in her journey.
I never comment but I simply had to reply to yours because I know the job search struggle all too well. Just an hour ago I came across a freelance post that would fit your qualifications and current lifestyle. It seems flexible enough to allow you to pursue Caitlin's proof reading course and whatever else you may do. I knew I would not meet their standards, but you certainly would. Are we allowed to share links here? Not sure, so I'll just say it was featured on the Problogger website titled 'Freelance Writer to Simplify Legalese'. The job post was published January 3, 2024 (yesterday). The timing of your comment and your story let me know it was no coincidence, and that I simply had to share this info.
All the best in your future endeavors!
This is true. I set up a website and before the next morning, I had phone calls, voice mails, and several emails asking to hire them to help me with my site. it was all so overwhelming that I cancelled everything and am going to try again in a few months.
Yikes! Definitely a good reminder to pay attention to the privacy settings so your information stays private until you want to share it. 🙂
very googd article keep good working
Wow, such a thorough & informative post!
Thanks Caitlin 🙂
I started using WordPress (quite a few years ago)
but ended up finding Weebly and really like it!
(I found Weebly didn’t have as much of a learning curve
and I was able to make my blog look a little ‘prettier’
than with the WordPress using Fotoflexer, Pixlr & Canva.
I think there’s a lot more choice now with WordPress
so I’ve been considering giving it another try
(seeing how it’s considered
‘The Most Powerful Blogging Platform in the World’!)
Note: the weebly website I’ve indicated is given just as an example!
It’s on temporary hiatus… 🙂
Heads up, team! It’s 2018 now (do a find and replace for 2017). Also, you can purchase your own domains on Weebly now. I ended up going that route after reviewing all the comments in the PA Grad group about WordPress difficulties and Weebly love. Someone even posted a comparison chart of the two which I found helpful in selecting a hosting and website option. I think it might be a different lesson that this one, but there’s a comment about Weebly being a subdomain option. Might be time to update in case there are others that would prefer that option.
Thanks for the heads up!
Thanks for posting this tutorial! I personally decided to buy my domain from Name.com in case I ever want to change hosting provider. Usually your name is a good domain name, but I just had the experience of not being able to contact someone because I misspelled their surname which is in their domain name. (Was that one ‘n’ or two?) Also, I Googled and found another person with my surname doing similar work, so I want to be different enough yet easy to remember. Oh and another reason to buy the domain right away is that coming back later you may find the price is higher because other people (you) are searching for this! Take it from a major procrastinator!
This is exciting, and scary at the same time hehe. I feel like i would so lost with words the minute I create my own website. I wouldn’t know what to type about myself. But I truly feel it’s worth the shot.
I would be so lost*
Great info! Thanks! However, I do have a question. I already have a website as a novelist, but I’m not real happy with it. Should I repurpose it into my proofreading website?
That’s completely up to you. You could repurpose it if you don’t have too much content uploaded already. It might depend on what your goals are for your website. Do you want to attract proofreading clients or market your books?
At the moment, I feel it’s more important to get clients.
You could always keep a page on your website advertising your books.
Excellent post! Thanks!
I don’t own a computer or a printer. What kind do I need to start my business. I’m on a limited budget. I have been using a Windows computer at the library. I can do email and Microsoft Word.
That will do, Ray! Be sure to bring along a USB (even a tiny one will hold several dozen files!) to save your work since saving it to the library’s computer probably isn’t an option.
The website is definitely a must, and I will definitely follow up on these points. I'm going to be doing a lot, and learning a lot.
You are a Godsend, Caitlin! I need to set up my own website(s) to present all that I offer. And this information came at just the right time! Thank you, Thank you, Thank you! And Bless you, too.
I'm not anywhere near this stage, just having completed Module 3, but this post is so informative and detailed that I think that I'll be able to create my own website when I get to that point. I'm bookmarking this right now. Thank you.
After reading this, I can’t believe that this process is simple. Maybe you have some ideas about how to develop a positive mindset to help get this done.
Question: How much time will it take to do this?